
Hi, I'm Manshi, a full-stack web developer. I write about building web apps and my journey in tech. Follow along as I share what I'm learning and creating.
Node.js is defined by Ryan Dahl (the original creator) as a "set of libraries that run on top of the V8 engine, allowing us to run JavaScript code on the server", Wikipedia defines it as "an open-source, cross-platform JavaScript runtime environment that executes code outside of a browser".
Essentially, Node.js is a runtime that allows us to execute JS outside the browser's domain.
We’re going to start looking at the internals of Node.js with a very simple diagram.
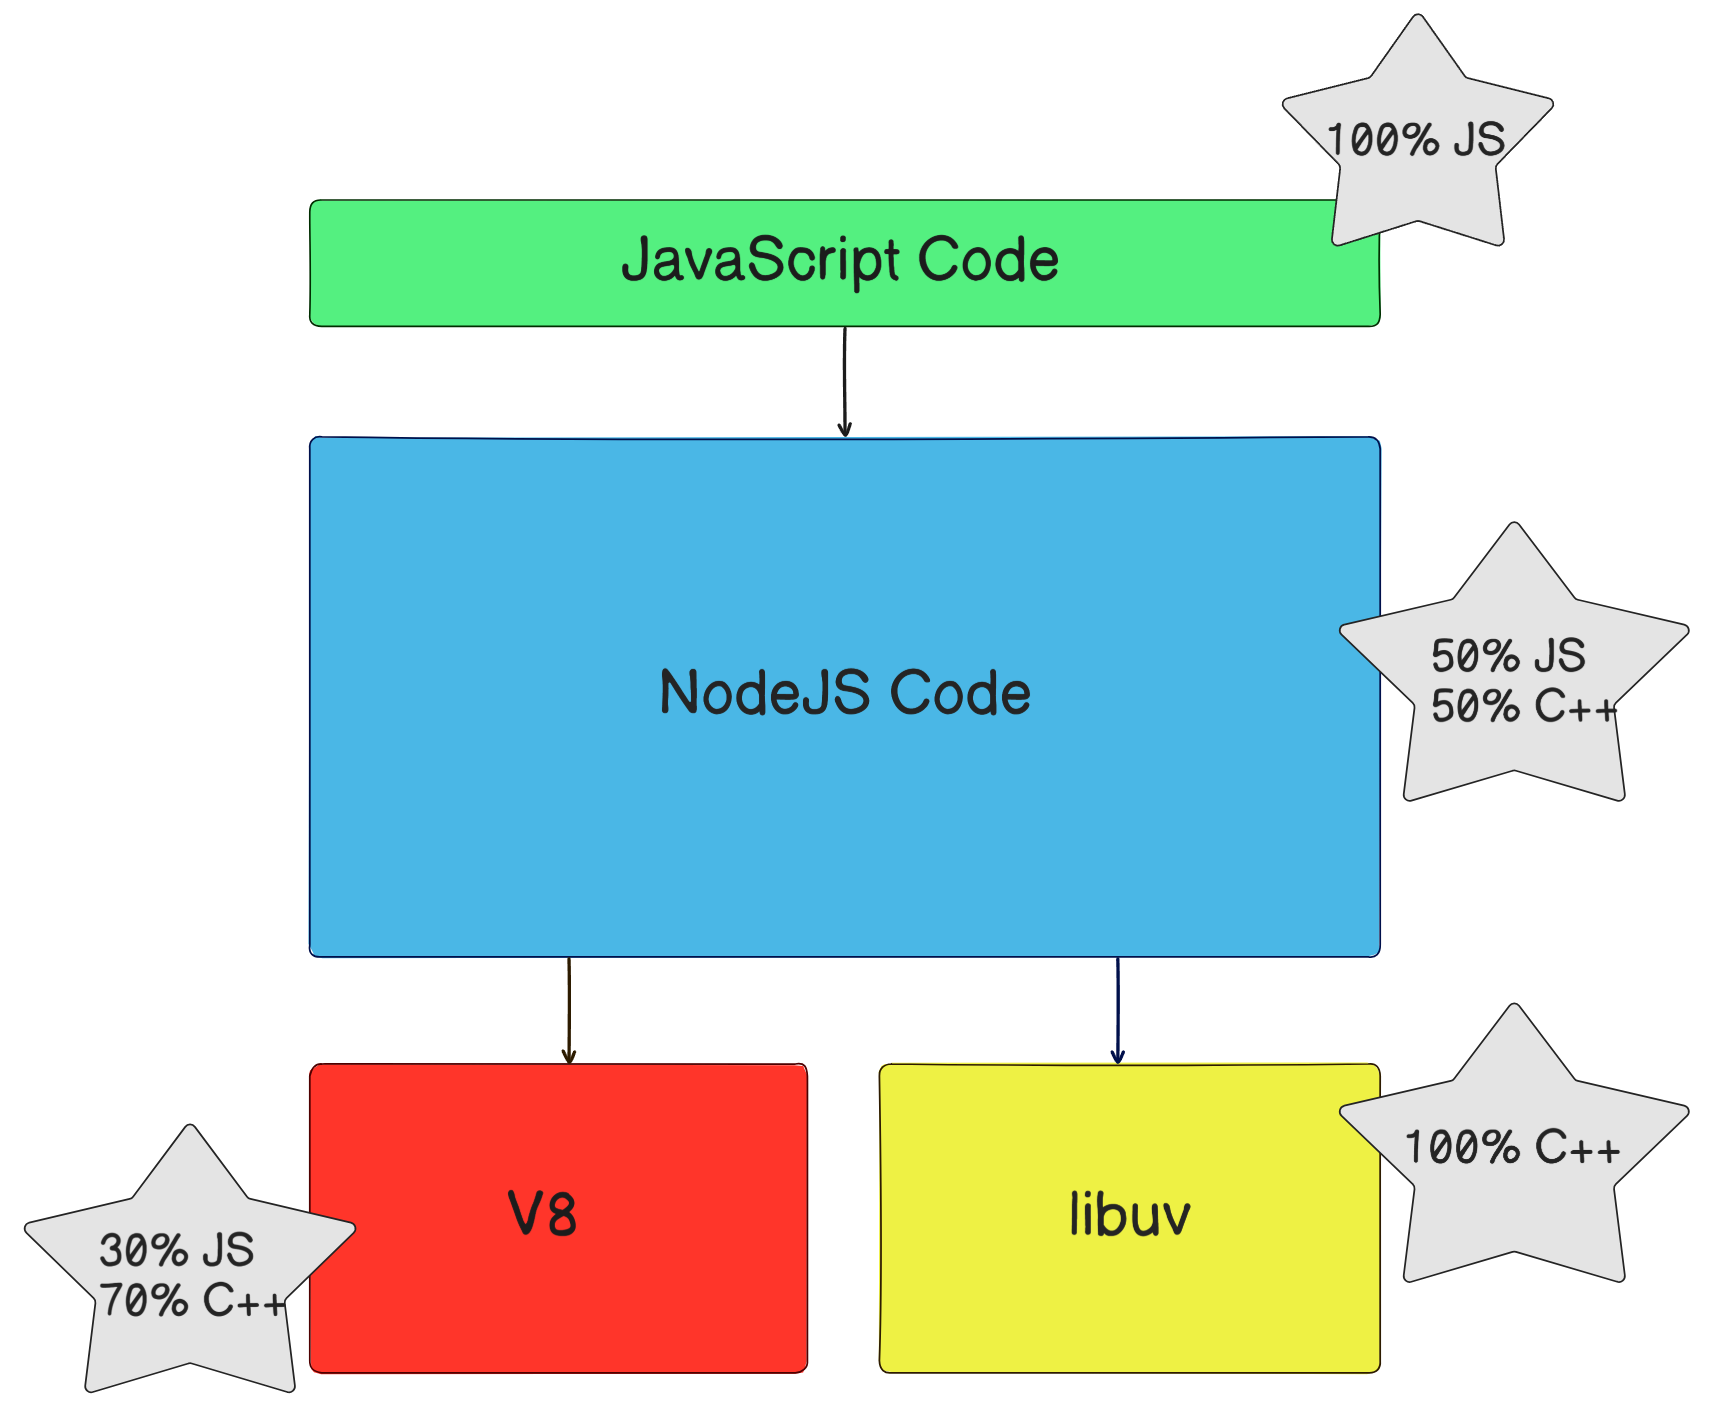
NodeJS internally has a collection of dependencies that it uses to actually execute your code. Two of the most important dependencies are V8 and libuv.
V8: V8 is an open-source JavaScript engine developed by Google. Initially designed for the Chrome browser, V8 is also utilized by Node.js to run JavaScript code outside of a web browser.
libuv: It's a C++ library that handles all the non-blocking input/output operations — like reading files, talking to databases, or making network requests. Instead of making JavaScript wait for slow tasks to finish, libuv says, “Don’t worry, I’ll take care of it in the background!” It uses something called an event loop and a thread pool to manage these tasks. This lets Node.js do lots of things at once, even though it's running on a single thread. Thanks to libuv, Node.js can be super fast and responsive, making it perfect for web servers and real-time apps.
You know how Node.js is single-threaded, right? That means it usually runs one thing at a time. But... what if it needs to do something slow, like reading a big file or encrypting a password?
If it waited for those tasks to finish, everything else would be stuck. 😩
That’s where the Thread Pool comes in—like Node’s little team of helpers working in the background. The Thread Pool is a set of background threads (usually 4 by default) managed by libuv. These threads handle blocking or computationally expensive operations so that your main thread (the event loop) stays free and responsive.
Node.js module wrapper function
NodeJS does not run our code directly, it wraps the entire code inside a function before execution. This function is termed a Module Wrapper Function.
How actually it looks:🧠
(function(exports, require, module, __filename, __dirname) {
   // Module code
});
Here, as we see the wrapper function has 5 arguments namely,
export: A reference to module.exports. It’s a shortcut used to define what a module exposes to other files. Internally, exports and module.exports start as the same object.
require: Used to import other modules.
module: An object representing the current module.
__filename: This is the absolute path of current module file.
__dirname: This is the absolute path to the directory containing the current module.

Now you might be wondering why Node.js even does that 😢
Imagine if everyone in class wrote their notes in one big notebook. Things would get messy really fast! You might accidentally erase someone else’s notes, or they could mess up yours. By wrapping each student’s notes in their own folder (like a module), everyone’s notes are safe and separate. The Module Wrapper in Node.js helps to keep code organized and private, while still allowing us to share important parts with others when needed.
So, the main reason Node does this is to keep each file separate, so the variables we make in one file don’t mess with other files. Basically, it helps keep everything organized and safe, like giving each file its own little world to live in. It also gives us some really useful things like require to bring in other files, exports to share stuff with other files, and even file path info like __filename and __dirname.
The Event Loop in Depth
Technically, the event loop is just a C program. Node.js operates on a single-threaded architecture, which means it can handle one operation at a time. However, it manages multiple tasks concurrently using the Event Loop, allowing asynchronous operations without blocking the main thread. The event loop runs continuously as long as your Node.js application is up and running, handling multiple operations executing concurrently.
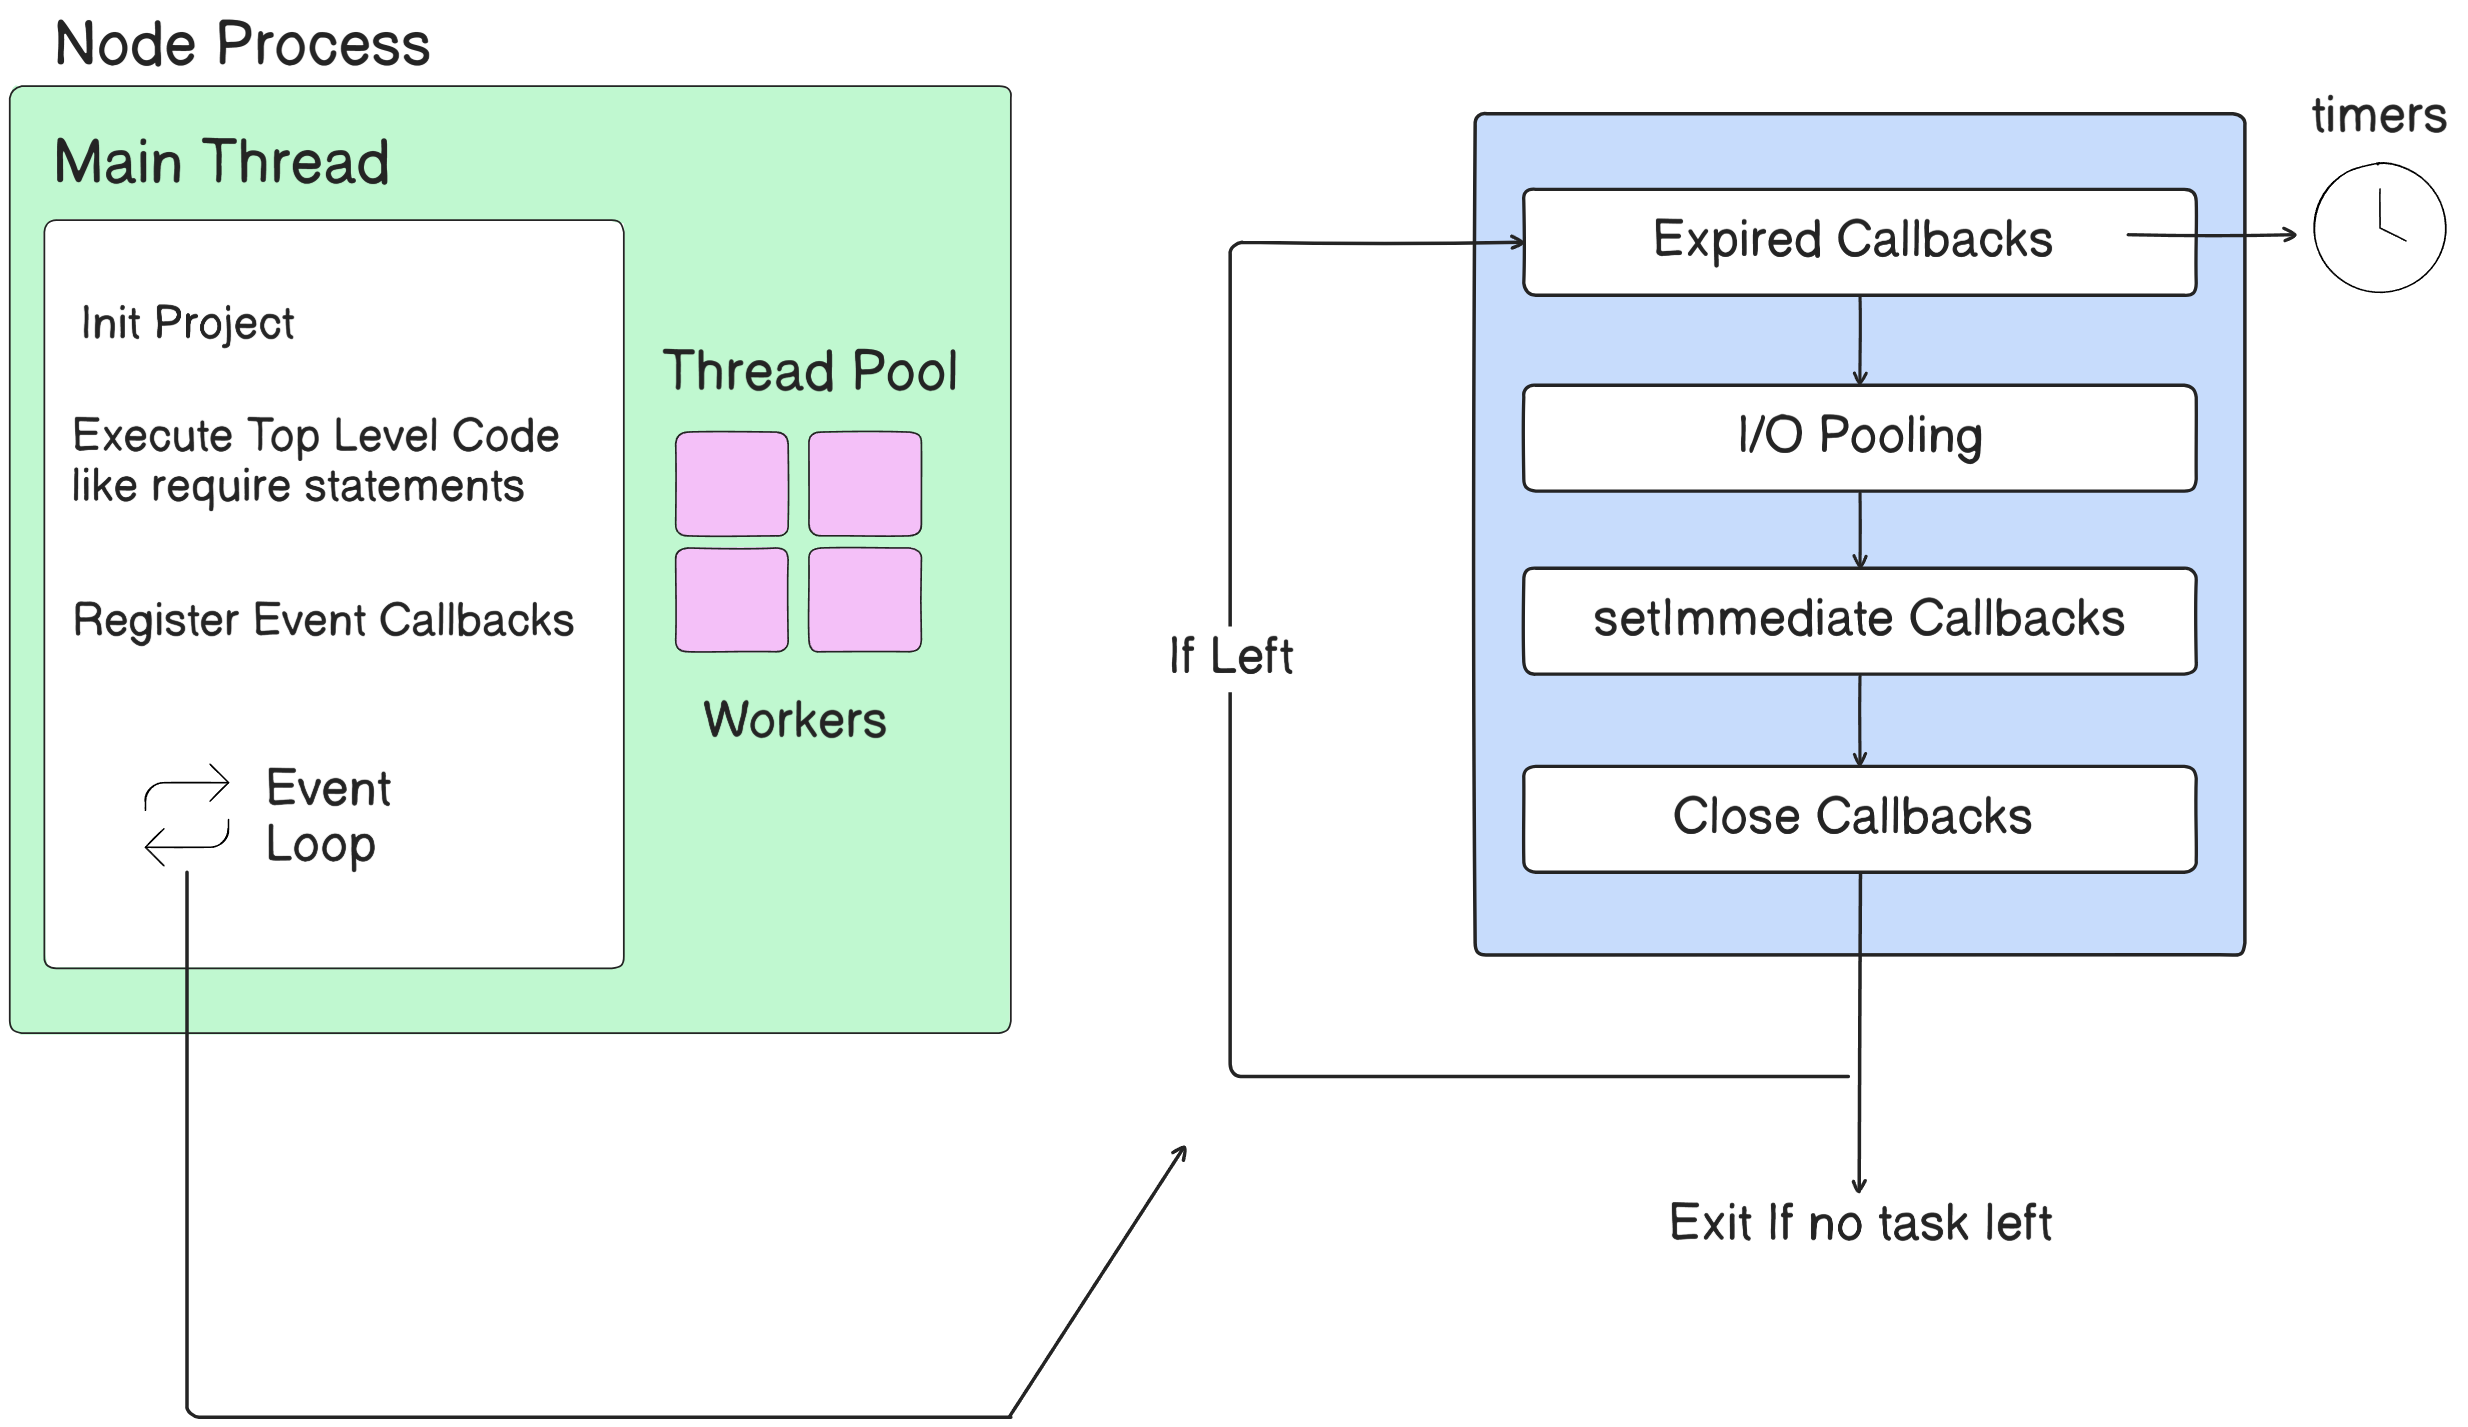
Phases of the Event Loop
The Event Loop consists of several phases:
Timers Phase: Executes callbacks scheduled by setTimeout() and setInterval().
Poll Phase: Retrieves new I/O events and executes related callbacks such as methods associated with the
fsandhttpmodules. If there are no pending timers, it will wait for I/O operations to complete.Check Phase: Executes callbacks scheduled by setImmediate() function, which is specific to Node.
Close Callbacks Phase: Handles callbacks for closed connections, allowing for any necessary cleanup operations such as when a socket or handle is closed.
Finally, there is the microtask queue which contains two separate queues.
nextTick queue which holds callbacks associated with the process.nextTick function.
Promise queue which holds callbacks associated with the native Promise in JavaScript.
It is important to note that the timer, I/O, check, and close queues are all part of libuv. The two microtask queues, however, are not part of libuv. Nevertheless, they are still part of the Node runtime and play an important role in the order of execution of callbacks.
const fs = require('fs');

setTimeout(() => {
  console.log('1. setTimeout');
}, 0);

setImmediate(() => {
  console.log('2. setImmediate');
});

fs.readFile(__filename, () => {
  console.log('3. fs.readFile callback');

  process.nextTick(() => {
    console.log('4. process.nextTick inside fs.readFile');
  });

  Promise.resolve().then(() => {
    console.log('5. Promise inside fs.readFile');
  });
});

process.nextTick(() => {
  console.log('6. process.nextTick');
});

Promise.resolve().then(() => {
  console.log('7. Promise resolved');
});

console.log('8. Synchronous log');
🧠 What happens step by step:
Node.js starts running the file top to bottom.
console.log('8. Synchronous log'); runs immediately because it’s normal code.
process.nextTick(...) is queued in the nextTick queue.
Promise.resolve().then(...) is queued in the promise queue.
setTimeout(...) is added to the timers phase, to run after 0ms.
setImmediate(...) is added to the check phase, which runs after I/O.
fs.readFile(...) is sent to the I/O phase. It’ll run its callback later.
🔁 Now Node.js starts the event loop:

Node.js starts the event loop.
process.nextTickruns first (nextTick queue is always given priority).
👉 Output:6. process.nextTickThen, Promises from the microtask queue are executed.
👉 Output:7. Promise resolvedThe event loop enters the Timers phase, and executes
setTimeout.
👉 Output:1. setTimeoutThe event loop goes to the I/O phase, and the
fs.readFilecallback is executed.
👉 Output:3. fs.readFile callbackInside the
fs.readFilecallback, a newprocess.nextTickand aPromiseare scheduled.After the I/O callback, Node runs microtasks again. First,
process.nextTick.
👉 Output:4. process.nextTick inside fs.readFileThen, the Promise callback inside
fs.readFileis executed.
👉 Output:5. Promise inside fs.readFileNow, the event loop enters the Check phase, and executes the
setImmediatecallback.
👉 Output:2. setImmediate
Important!
Node.js checks the microtask queues after every phase of the event loop.
✅ Final Output in order:
8. Synchronous log
6. process.nextTick
7. Promise resolved
1. setTimeout
3. fs.readFile callback
4. process.nextTick inside fs.readFile
5. Promise inside fs.readFile
2. setImmediate
Conclusion
Understanding Node.js internals empowers you to build faster & more efficient applications. These insights help you write production-grade Node.js code.
Keep exploring—there’s always more under the hood. Happy hacking! 💡
If you found this blog helpful, show it some ❤️ by liking or dropping a comment!


